
|

|
MIAD Industrial DesignOVERVIEWTitle: Tattoo Grill
Size (cm): 48.24 x 73.66 Medium: Digital Date of Completion: December 2023 EXHIBITION TEXTThe Tattoo Grill is an electric countertop grill that imprints personalized designs onto food. On the lid of the grill, the user selects squares that correspond with a cubed plate within the grill. The cubes then cook a design on the food. This product was inspired by the Hello Kitty toaster and the George Foreman grill, and photos of these from the internet are used in the final poster. My design demonstrates the human tendency to customize in order to display identity and connect with others.
|
Inspiration

|
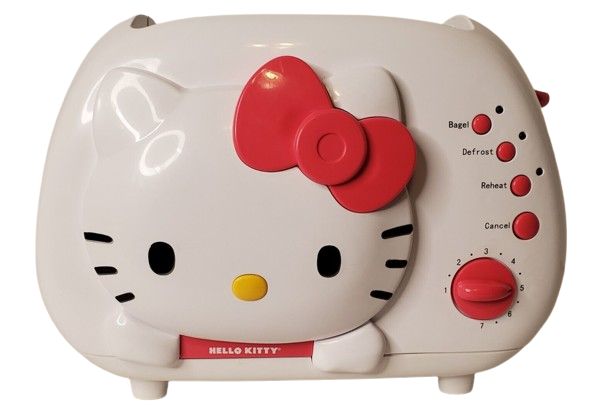
My initial inspiration came from the toaster in my kitchen, which is a Hello Kitty imprint toaster. Inside there is a metal plate attached to the heating grate, and it creates Hello Kitty's face into the toast. The toaster is otherwise normal, with bagel, defrost, reheat and cancel buttons, and an ordinary dial timer. The Hello Kitty's face is emphasized on the side of the toaster to show the purpose of the toaster is to imprint Hello Kitty onto the toast. This colors of the toaster also reflect this, as pink, white, yellow and black are commonly associated with Hello Kitty. This toaster was created for those who love the character, allowing them to express that part of their identity on a piece of toast.
|
I imagined a new innovation that takes this concept to a more modern and elaborate level. Instead of a toaster specifically made to please one type of person, such as someone who likes Hello Kitty, I wondered if there could be a toaster with an infinite number of customizing possibilities. Any kind of person could purchase this product, and it would please them no matter what mood they were in.

|

|
After completing the ideation phase, I returned to this stage and realized I was also inspired by the George Foreman grill. When discussing my ideas with my peers, the concept of customizing food other than toast was brought up. Obviously a toaster would not allow this to happen, but a flat cooker such as the George Foreman grill could cook meat, sandwiches and toast, while imprinting a customizable design. I chose to model the final product after this grill, with two halves that enclose and cook food.
|
Planning

|
After I had a concept in mind I consulted with Murf and explained my idea. As I talked, he quickly sketched on a piece of printer paper what I was describing. I was imagining a toaster with an inner plate composed of squares that can pop forward and imprint the toast. The squares would be controlled by an app to change the design every time, allowing the user to continuously customize their toast. Murf explained that the designs would be similar to 8 bit or low rez art because they are simple and composed of squares. He helped me expand on my original idea by suggesting upgraded versions of the toaster. In addition to the app, there could be a screen on the toaster showing the design. Taking it a step further, there could be a touch screen on the toaster, completely eliminating the need for an app.
|

|
My first official planning sketch was of the most basic toaster offered. This is the cheapest and simplest version for consumers. There are the same buttons and dial as the Hello Kitty toaster, with an ergonomic finger level, and a crumb tray that can be removed from the bottom. Within the toaster, there is the plate with cubes that pop forward. At the bottom of the sketch there is an example of a design. This toaster connects to a phone with a cord, and on the phone there is an app. The user can select which cubes they want to pop forward, creating a design. This then signals the toaster to move the cubes, and the design is toasted onto the bread.
|
|
The second design is similar to the first, but has a higher level of technology because the app connects via bluetooth instead of a cord. I also experimented with a different design of the buttons. The buttons are large bubble letters of the command and are on one side of the toaster. This adds balance because on the other side there is a screen that shows the design created through the app. On this screen there is a print button, so once the design is finalized the plate cubes are activated and the toast is imprinted. When creating this sketch, I also envisioned adding different plates that could be interchanged in the toaster. The original plate is 13 x 7 cubes, but there could be a more detailed plate with 25 x 10 cubes, and a 9 x 5 that creates a softer image.
|

|

|
The third and final sketch is the elite toaster, the most advanced and technologicallly advanced of the series. This one completely eliminates the need for an app, as Murf suggested. The touch screen now doubles as the design creator and visualizer. Users select squares directly on the side of the toaster. The number of squares changes depending on the plate that is in the toaster. There is also an option to save designs for future use. The toast button at the bottom then signals the toaster. In this app, there would be options for templates, for inspiration or if someone just wanted a template. The elite toaster is best for an artistic or hands on person, and is child friendly but should be used with adult supervision.
|
|
After the initial planning sketches, I drew my third toaster idea on a large whiteboard for the critiquing process. During this stage, I presented my idea to the class, my teacher and Murf, and received feedback, which is written in blue. The additional ideas include magnets to secure the plate, the option to save the design for future use, making the pop tart plate pressure sensitive, and even making a machine that can customize food other than toast.
While this happened, Murf drew two more sketches to demonstrate the ideas. The first sketch represents the original idea I imagined, of a toaster, and the second sketch is of a kitchen tool similar to the George Foreman grill, made to cook and customize food other than toast. I liked the idea of creating a machine that does this, so I applied my original ideas of the toaster to a George Foreman style grill. |

|

|

|
process
After the planning phase, I had a clear idea of what I wanted my product to be. Before drawing the final piece, I did a few more practice sketches to layout the design. Then I drew the final drawing on a thick piece of white paper, first using pencil, and then outlining it in black marker.

|

|
The sketch on the left is a rough layout of the different drawings I wanted to be on the second poster, which displays the final product. I knew I wanted a large image of the grill open showing how the plate is inserted. I also wanted to show someone using the screen to create the design. I included three circles at the top to show the different plates that come with the grill, and three possible foods that can be cooked. Lastly, I drew a steak with an imprint on it, to demonstrate what the grill can do. On the right I refined this by drawing the actual number of lines, although it wasn't in the correct perpsective. After this I felt I had enough practice to draw the final piece.

|
To use the correct perspective, I ensured all the verticle lines were parallel, and all the horizontal lines were parallel. This was an extremely difficult and time consuming stage because I kept messing up and erasing and redoing the lines. When it came to making the grid on the grill, I had to measure and ensure the lines were evenly spread out. Once it was close to perfect, I started going over the pencil in black sharpie to create a more refined and professional look.
|

|

|
Since I demonstrated the plates inside the grill and how they attach, I also wanted to show viewers how the design is created. I drew a second drawing of the top of the grill when it is closed. On the lid there is the interactive screen, which allows people to choose the squares they want for the design. I displayed a finger selecting squares to form a heart to communicate that this is a touch screen. Also on the screen there are options to exit and return to the home, save the design for future use, cook, which activates the cubes to imprint the food, and lastly change the plate, which would replace the 13 x 7 grid with either the 25 x 10 or the 9 x 5. The user would select change plate if different plates were inside the grill.
|

|
To draw the steak, I used a reference photo from a vector image website to help me capture the overall shape. Once I had that, I traced the heart from the screen design drawing to keep the size and proportions consistent throughout the poster. Finally, I outlined the drawing in sharpie.
|

|

|

|

|

|
Lastly, I drew the three plate options for the grill, the 9 x 5, 13 x 7, and 25 x 10. In each drawing there is the actual number of squares, which I created using a pencil and ruler, then outlining in sharpie later. These drawings are small in real life because I intended for them to appear small on the final posters.
|
NOTE: The images that appear above, similar to the final grill, screen and steak drawings, are photographs of the drawings with the backgrounds removed. I used the website removebg.com to achieve this, and it eliminated any strange lighting to match the poster background perfectly and create a more professional image.
poster 1

|

The first poster was required to showcase the problem statement, the objective of the design, the existing solutions that were investigated, inspiration for the piece, and the ideation. To start the poster, I opened photopea and started a new project with the dimensions 19" by 29" and 200 DPI. Next, I had to choose a font. I wanted one font to be the headings and another compatible font to be the descriptive text. I experimented a lot with different fonts, which were found using the text tool on the left hand tool bar, and then going to the top and scrolling through the options. I also played with adjusting the size until it was not too overbearing but clearly showed the heading. I ended up choosing a font that I felt was bold, sophisticated and refined, but not distracting or difficult to read. For the descriptive text, I chose a very similar font, but made it much smaller and lowercase.
|

|
After I chose the fonts, I determined that my problem statement was, "I have to come up with an innovation that further connects humans through cooking." This was the overarching idea I considered throughout the creation process, as I wanted to demonstrate how humans tend to customize aspects of life in order to form connections. Next I stated that my objective was, "I will create a kitchen tool that customizes images and imprints them onto various foods." This was a fairly simple stage, but then I had to add the images of existing solutions. These solutions were also my sources of inspiration, so I combined those two headings under "Existing Solutions".
|
I had saved the two photos of the George Foreman grill and the one of the Hello Kitty toaster on my computer. I then opened them on photopea using the file, open tool. I had to adjust the size to ensure they didn't take up too much poster space. This required some guessing and checking, and I finally settled on making each image roughly 5" by 4", as shown above. To add them to the main poster, I selected all, which added a dotted border line, then copied and pasted them.
|
The image on the right shows my progress after the previous step. I wanted to explain my existing solutions, and was advised to create pros and cons of each. This ended up being a lot more text than the previous statements, so I had to shrink the text even more, but kept the font consistent for coherence. Each solution was good for a different reason, but lacked the benefit that the other solution had. For example, the Hello Kitty toaster imprints a fun image, but can only be used to make toast. On the other hand, the George Foreman grill can cook a variety of foods, but only imprints boring lines. After this section, I only had the ideation left. I followed similar steps as before to open images of my drawings from the planning phase and paste them onto the collage. I added information about each of them, which were condensed versions of the descriptions I wrote on this website. I wanted the information to be thorough enough that someone reading it could understand, but not too much detail that would lose their interest. I also had to consider the amount of space I had left, which at the end was not a lot.
|

|
poster 2

|

|
The second poster was intended to showcase the final product and explain what it is, who uses it and the context it is used in. I started the exact same way I set up poster 1. Then I opened the image of my final grill drawing, with the background removed. For some reason photopea was not allowing me to copy and paste the image as usual onto the poster. After some research, I discovered a way around this was using the "duplicate into" option that appears when right clicking on the layer. This allowed me to duplicate the image and send it directly to the main poster tab.
|

|

I used the duplicate into method for the rest of the images I drew and took photos of. Originally my plan was to utilize internet stock photos of the different foods the grill can cook. After removing the backgrounds, uploading them, and duplicating into the main poster, I realized I had limited space and these images were unnecessary compared to the other drawings. Since they were not a priority and they threw off the black and white color scheme, I eliminated them.
|
|
I arranged the photos in what I believed was the most logical order. The interactive screen is at the top since the design begins there, followed by the main image of the grill with the plate being inserted. Underneath there are small images of the various plates, and the final food product, which is comes last in the process. I labeled each of the plates, and added descriptions next to each image. I emphasized what the product was, who it is meant for, and where it can be used, while trying to make it easy to read.
|

|
Once both of the posters were complete, I ensured they were the correct measurements and DPI, and exported them as JPGs.
experimentation
|

|

After I managed to complete the drawing, I realized one of the problems was the lack of a vanishing point. When drawing in one perspective a vanishing point is necessary to connect everything to. It creates consistency and makes the process much simpler than trying to drag the ruler across from one line to draw a parallel one. I was able to complete the drawing without one, but in the future it would create a more accurate drawing.

|
I wanted to add a border around the poster to create a colorful pop and help contain and organize the information, making it more cohesive. I used the line tool on the left hand tool bar, but I encountered a lot of difficulties with customization and consistency. I had to click on various tools before finding the color customizer. In the photo on the left, the photos are a thin and boring gray, which I did not want. I discovered that right clicking on the layer, from the list on the right side, opens a variety of options.
|

|
When the window opens, there are two tabs at the top. The properties tab includes layer, mask, and live shape options. The layer contains the color picker tool. I dragged my cursor to find the perfect dusty green, neutral enough to not be a distraction, but still an interesting color. In the live shape tool, there is an option to change the angle degree of the angle. This solved the problem of making the horizontal lines perfectly 0 degrees and the verticle lines 90 degrees.
|

|

|
Even after these adjustments were made, I realized I wanted a thicker line. I found the option to increase size at the top, but discovered the line had to be made after adjusting the size. I decided on size 10 px, and had to repeat the process, but it was easier after I made the above discoveries. Once I had made one perfect line, I was able to duplicate it for the other side, and simply drag it across the poster. One problem I never found a solution for was ensuring the lines were the same distance away from the edge of the poster. I had to use my own judgement, and accept that it would not be exact.
|

|
|
Another problem I consistently faced was image size. All of the images I opened and added to the poster were too large. However, in order to change the size I had to return to the tab of that individual image, then go to image, and image size. The screenshot on the right shows several versions of the same image. There is the original size, which is much too large, and then a few versions in the center that are too small. I discovered that changing the DPI of the image was essential in maintaining a clear image. After I changed the DPI of the images to 200, to match the poster, it strangely affected the size of the image. Before I had noticed the measurements seemed incorrect. For example, 8 by 5 inches took up more than half of the 19 by 29 inch poster. Once I made this adjustment the image sizes appeared more accurate, and through trial and error I was able to find correct image sizes.
|

|
critique

compareThe Tattoo Grill and the George Foreman grill both cook a variety of foods, including meats and paninis. The George Foreman grill opens into two halves with handles on the top and bottom, which was adopted for the Tattoo Grill. The size of the Tattoo Grill is also intended to be around the same as the George Foreman grill, so it can be utilized as a personal countertop tool. The concept of the Hello Kitty toaster and the Tattoo Grill are similar, as they both imprint a design to personalize food. Reflecting on the process, I wish I would have created a more obvious cooking dial to display in the final drawing. I wanted it to be similar to the George Foreman dial, which is compatible with multiple foods.
|
contrastThe Hello Kitty imprint plate is within the toaster, similar to the plate in the Tattoo Grill, but cannot be removed as it is a flat metal cutout of her face fused to the grate. Unlike the toaster, the Tattoo Grill has a more complex cubed plate that can be swapped with two other grid options. It is inserted using magnets within the grill, and is not fused to allow for the exchange of plates. While the plate of the toaster consistently imprints Hello Kitty's face, the Tattoo Grill has a changeable design, customized by the user. There are no screens on either of the products used for inspiration. The Tattoo Grill was intended to be a more technologically advanced version, and has a screen to achieve this. The George Foreman grill does not imprint any design other than grill lines. The Hello Kitty toaster only makes toast, but the Tattoo Grill makes a variety of foods.
|
reflection
Product design was a completely new field for me. The skills I utilized during this process helped me understand that art is not restricted to painting, sculpting, or other fine art mediums, but includes the broader concept of creating an idea. Originally I was set on creating a toaster, but the design process helped me expand my ideas and make a product that can be used by a wider audience. I spent more time in the planning phase than any other project, which paid off because I felt proud of the final product. This project was also collaborative, which influenced me to change my product to a grill instead of a toaster. I had to utilize my sketching skills to draw detailed plans, as well as my presentation skills to explain the concept to my peers. When I compiled my ideas on the final posters, I encountered numerous technical difficulties. I managed to overcome most challenges, and it did not prevent me from communicating my ideas. My favorite, and most successful, part of the project was the second poster. I felt my drawings looked clean and professional. I would personally use the Tattoo Grill, and I hope others would want to buy it or at least appreciate the technological innovation of it.
ACT
Clearly explain how you are able to identify the cause effect relationship between your inspiration and its effect on your artwork?
I applied the idea of imprinting a design from the Hello Kitty toaster. I was also inspired by the George Foreman grill and the two halves that enclose to cook food.
What is the overall approach the author has regarding the topic of your inspiration?
The George Foreman grill can be used to cook a wide variety of food, including meats and panini sandwiches. The Hello Kitty toaster is an ideal product for Hello Kitty fans, and imprints a simple image.
What kind of generalizations and conclusions have you discovered about people, ideas, culture, etc. while you researched your inspiration?
People will buy a product they feel represents them and demonstrates who they are to others.
What is the central idea or theme around your inspirational research?.
It is a human tendency to personalize things.
What kind of inferences did you make while reading your research?
Humans look for ways to customize aspects of their lives to feel a connection with others.
bibliography
images
eBay. (2023). Hello Kitty 2-Slice Wide Slot Bread/Bagel Toaster (KT5211) Tested & Working. eBay. Retrieved December 10, 2023, from https://www.ebay.com/itm/325573925383
George Foreman. (2023). George Foreman GR10B Indoor Grill : Patio, Lawn & Garden. Amazon.com. Retrieved December 10, 2023, from https://www.amazon.com/George-Foreman-GR10B-Champ-Indoor/dp/B073538YWV
Nikiteev. (2023). vector cartoon illustration - isolated raw piece of meat Stock Vector. Adobe Stock. Retrieved December 10, 2023, from https://stock.adobe.com/images/vector-cartoon-illustration-isolated-raw-piece-of-meat/61269720
Oz Game Shop. (2023). George Foreman Small Grey Steel Grill 25031 UK Plug. Ozgameshop.com. Retrieved December 10, 2023, from https://ozgameshop.com/home/rkw/george-foreman-small-grey-steel-grill-25031-uk-plug/#/
inspiration
Taylor, M. (2021, October 25). George Foreman Grill Review. In The Kitchen With Matt. Retrieved December 10, 2023, from https://www.inthekitchenwithmatt.com/george-foreman-grill-review
Gadget Sharp. (2022). 11 Innovative and Functional Toaster Designs. Gadget Sharp. Retrieved December 10, 2023, from https://www.gadgetsharp.com/post/11-innovative-and-functional-toaster-designs/
Gadget Sharp. (2022). 11 Innovative and Functional Toaster Designs. Gadget Sharp. Retrieved December 10, 2023, from https://www.gadgetsharp.com/post/11-innovative-and-functional-toaster-designs/
